创建三维图形
点成线,线成面。利用预设好的x,y值来初始化点,再将各坐标点连线就能构成一个平面图形。因为是在一个平面上,所以各个点的z值是相同的,只需要定义好x,y坐标的值即可。

创建坐标点:
// 点的z值相同
const z = 30
// 点坐标
points[0]  = new Point3d( -120, -24, z)
points[1]  = new Point3d(  100, -162, z)
points[2]  = new Point3d( 100,  -112, z)
points[3]  = new Point3d( -90,  0, z)
points[4]  = new Point3d(  100,  112, z)
points[5]  = new Point3d( 100,  152, z)
points[6]  = new Point3d(-120,  24, z)
设置每个点的消失点和中心点:
points.forEach(point => {
  // 设置消失点
  point.setVanishingPoint(vpX, vpY)
  // 设置中心点
  point.setCenter(0, 0, 200)
})
将坐标点依次连线(连线的时候每个点的x,y值都是经过透视图计算的,因为是在三维里,所以不是用之前定义好的坐标):
function draw (point, index) {
  if (index !== 0) {
    // 获取每个点的透视图坐标并连接起来
    ctx.lineTo(point.getScreenX(), point.getScreenY())
  }
}

;(function drawFrame () {
  window.requestAnimationFrame(drawFrame)
  ctx.clearRect(0, 0, width, height)

  angleY = (mouse.x - vpX) * 0.0005
  angleX = (mouse.y - vpY) * 0.0005

  points.forEach(move)
  // 填充颜色
  ctx.fillStyle = '#f0c3c2'
  ctx.beginPath()
  // 从第0点开始连线
  ctx.moveTo(points[0].getScreenX(), points[0].getScreenY())
  // 绘制
  points.forEach(draw)
  ctx.closePath()
  ctx.stroke()
  ctx.fill()
})();
使用三角形
所有的三维图形在绘制前都会简化为一个三角形集合。使用三角形的好处:
- 无论一个三角的三个顶点如何放置,都可以肯定三个顶点都处于同一个平面上,三角形表面指向同一个方向。如果不是三角形而是其他的多边形,它就有可能随着顶点位置的变化而变得扭曲。
- 任何复杂的多边形都可以由三角形组成。
- 使用三角形可以在几何学上做更进一步的优化,三角扇(triangle fans)和三角条带(triangle strips)是三维几何学中常用的方法,因为它们可以高效的遍历所有顶点。
- 可以用三角学计算来操作它们。
用三角形组成的图形:

定义所有顶点坐标:
// 点的z值相同
const z = 30
// 点坐标
points[0]  = new Point3d( -120, -24, z)
points[1]  = new Point3d(  100, -162, z)
points[2]  = new Point3d( 100,  -112, z)
points[3]  = new Point3d( -90,  0, z)
points[4]  = new Point3d(  100,  112, z)
points[5]  = new Point3d( 100,  152, z)
points[6]  = new Point3d(-120,  24, z)
创建一个三角形类,用于传入三个点绘制三角形:
// 三角形类
class Triangle {
  constructor (a, b, c, color = '#ff0000') {
    this.pointA = a
    this.pointB = b
    this.pointC = c
    this.color = color
    this.lineWidth = 1
  }
  draw (context) {
    context.save()
    context.lineWidth = this.lineWidth
    context.fillStyle = context.strokeStyle = this.color
    context.beginPath()
    // 从a点开始连线绘制三角形
    context.moveTo(this.pointA.getScreenX(), this.pointA.getScreenY())
    context.lineTo(this.pointB.getScreenX(), this.pointB.getScreenY())
    context.lineTo(this.pointC.getScreenX(), this.pointC.getScreenY())
    context.closePath()
    context.fill()
    if (this.lineWidth > 0) {
      context.stroke()
    }
    context.restore()
  }
}
创建三角形:
triangles[0] = new Triangle(points[0], points[3], points[6], '#f0c3c2')
triangles[1] = new Triangle(points[0], points[1], points[3], '#f0c3c2')
triangles[2] = new Triangle(points[1], points[2], points[3], '#f0c3c2')
triangles[3] = new Triangle(points[3], points[4], points[5], '#f0c3c2')
triangles[4] = new Triangle(points[3], points[5], points[6], '#f0c3c2')
最后的绘制:
function draw (triangle, index) {
  triangle.draw(ctx)
}

;(function drawFrame () {
  window.requestAnimationFrame(drawFrame)
  ctx.clearRect(0, 0, width, height)

  angleY = (mouse.x - vpX) * 0.0005
  angleX = (mouse.y - vpY) * 0.0005

  points.forEach(move)
  // 绘制三角形
  triangles.forEach(draw)
})();
实体建模
要建模一个立方体需要8个顶点来定义它的8个角:
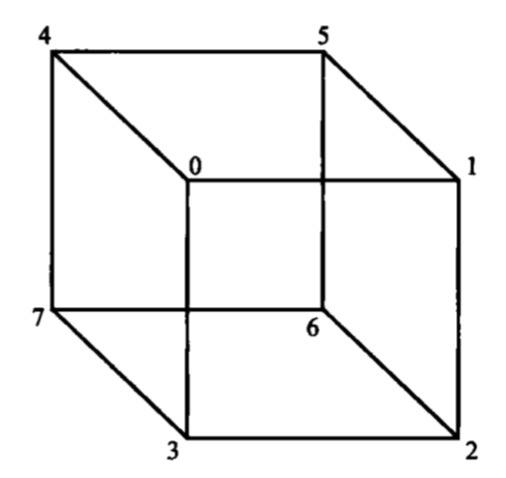
点的位置用代码表示:
//正面
points[0] = new Point3d(-100, -100, -100)
points[1] = new Point3d( 100, -100, -100)
points[2] = new Point3d( 100,  100, -100)
points[3] = new Point3d(-100,  100, -100)
//背面
points[4] = new Point3d(-100, -100, 100)
points[5] = new Point3d( 100, -100, 100)
points[6] = new Point3d( 100,  100, 100)
points[7] = new Point3d(-100,  100, 100)
然后定义三角形,因为有6个面,每个面由2个三角形组成,所以会有12个三角形:
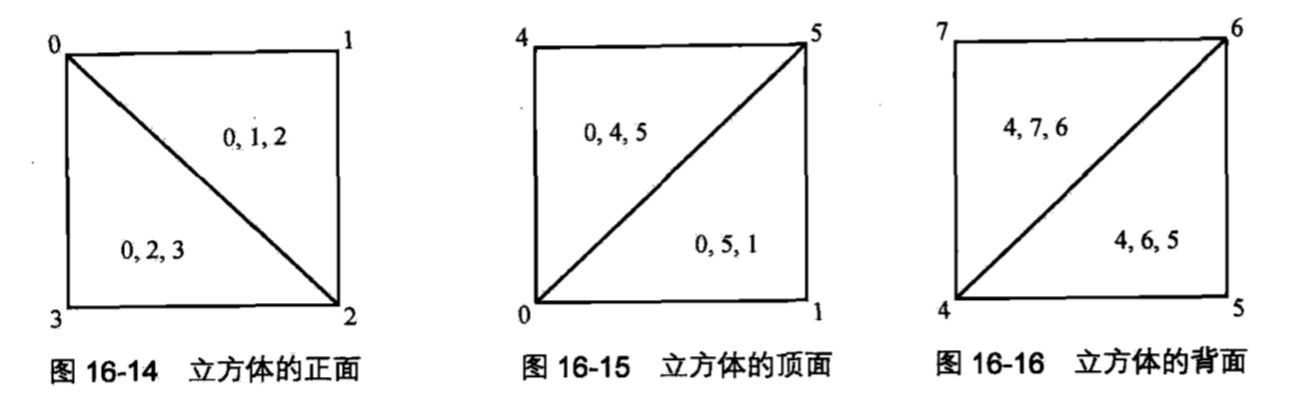
将每个三角形的顶点按照顺时针方向排列,否则会有些面显示不出来,侧面或者背面定义的时候需要在脑海里将立方体旋转让当前这个面朝向你:
//front
triangles[0]  = new Triangle(points[0], points[1], points[2], "#6666cc")
triangles[1]  = new Triangle(points[0], points[2], points[3], "#6666cc")
//top
triangles[2]  = new Triangle(points[0], points[5], points[1], "#66cc66")
triangles[3]  = new Triangle(points[0], points[4], points[5], "#66cc66")
//back
triangles[4]  = new Triangle(points[4], points[6], points[5], "#cc6666")
triangles[5]  = new Triangle(points[4], points[7], points[6], "#cc6666")
//bottom
triangles[6]  = new Triangle(points[3], points[2], points[6], "#cc66cc")
triangles[7]  = new Triangle(points[3], points[6], points[7], "#cc66cc")
//right
triangles[8]  = new Triangle(points[1], points[5], points[6], "#66cccc")
triangles[9]  = new Triangle(points[1], points[6], points[2], "#66cccc")
//left
triangles[10] = new Triangle(points[4], points[0], points[3], "#cccc66")
triangles[11] = new Triangle(points[4], points[3], points[7], "#cccc66")
最终效果:Demo
背面剔除
在绘制三维实体的时候需要将背对的面隐藏起来(不绘制看不到的面),不然背对的面绘制出来,导致看上去会很奇怪,像这样 Demo。
解决办法:当一个面背对你的时候它的顶点顺序是逆时针的,面向你的时候顶点则是顺时针的,创建一个isBackface方法,通过面向和背向时点的顺序不同求出是否是背面。
// 计算三角形2条边的长度(顶坐标都经过透视图计算),然后用乘法比较。结果返回true则为背面。
function isBackface () {
  const cax = this.pointC.getScreenX() - this.pointA.getScreenX()
  const cay = this.pointC.getScreenY() - this.pointA.getScreenY()
  const bcx = this.pointB.getScreenX() - this.pointC.getScreenX()
  const bcy = this.pointB.getScreenY() - this.pointC.getScreenY()
  return cax * bcy > cay * bcx
}
在绘制三角形的时候加上这个方法:
// 三角形类
class Triangle {
  ...
  draw (context) {
    if (isBackface()) return
    ...
  }
  isBackface () { ... }
}
最终效果:Demo
深度排序
深度排序即对物体的深度(z轴位置:zpos)进行排序,想要物体离自己最近的面先被绘制,就需要先绘制远的面,再绘制离我们近的面。如果不进行排序会导致物体随着旋转,面的顺序错乱。
由于物体的面是由三角形组成的,每个三角形又由三个点连线组成,所以判断面与面之间的深度可以通过对比每个面的点的深度来进行,即三个点的z值取当中最小的作为这个面的深度。为三角形类创建一个getDepth方法获取面的最小深度:
// 三角形类
class Triangle {
  ...
  getDepth () {
    return Math.min(this.pointA.z, this.pointB.z, this.pointC.z)
  }
}
在绘制的时候对物体的面进行升序排列,让z值大的面先绘制:
function depth (a, b) {
  return b.getDepth() - a.getDepth()
}

;(function drawFrame () {
  window.requestAnimationFrame(drawFrame)
  ctx.clearRect(0, 0, width, height)

  angleY = (mouse.x - vpX) * 0.0005
  angleX = (mouse.y - vpY) * 0.0005

  points.forEach(move)
  // 深度排序
  triangles.sort(depth)
  // 绘制三角形
  triangles.forEach(draw)
})();
三维灯光
为了让物体更加真实,可以加入光源。最简单的光源有2个属性:位置和亮度。在复杂的三维系统中还会有照射方向、颜色、衰减率、圆锥区域等其它属性。
创建一个Light灯光类保存位置和亮度:
// 物体与灯光的距离不会影响物体的亮度,灯的坐标只是用来计算光线角度,只有 brightness 属性才会影响亮度,取值在0.0 ~ 1.0之间。
class Light {
  constructor (x = -100, y = -100, z = -100, brightness = 1) {
    this.x = x
    this.y = y
    this.z = z
    this.brightness = brightness
  }
  setBrightness (b) {
    this.brightness = Math.min(Math.max(b, 0), 1)
  }
}
根据光源照射在三角形上的角度来改变它的颜色值,直接面向灯光显示正常颜色,随着旋转背向灯光则越来越暗。每个三角形需要得到灯光的信息,所以为Triangle创建一个light属性,遍历的时候设置对light的引用:
// 三角形类
class Triangle {
  constructor () {
    this.light = null
  }
  ...
}
// 设置对灯光的引用
triangles.forEach(triangle => {
  triangle.light = light
})
接下来每个三角形根据灯光的角度、亮度和自己的位置计算出一个调整后的颜色值:
// 三角形类
class Triangle {
  ...
  draw (context) {
    ...
    // 设置基于灯光的颜色,从getAdjustedColor方法获取
    context.fillStyle = context.strokeStyle = this.getAdjustedColor()
  }
  getAdjustedColor () {
    // parseColor 用于将颜色字符串转成数字表示
    const color = parseColor(this.color, true)
    // 把三角形的基础颜色分离为红、绿、蓝分量
    let red = color >> 16
    let green = color >> 8 & 0xff
    let blue = color & 0xff
    // getLightFactor 返回一个0.0~1.0之间的数字,代表三角形颜色的改变系数,1为全亮度,0为黑色
    const lightFactor = this.getLightFactor()
    // 每个颜色都乘以这个系数,通过 parseColor 方法组合成一个全新的基于灯光的色值
    red *= lightFactor
    green *= lightFactor
    blue *= lightFactor
    return parseColor(red << 16 | green << 8 | blue)
  }
  // 返回一个0.0~1.0之间的数字,代表三角形颜色的改变系数,1为全亮度,0为黑色
  getLightFactor () {
    const ab = {
      x: this.pointA.x - this.pointB.x,
      y: this.pointA.y - this.pointB.y,
      z: this.pointA.z - this.pointB.z
    }
    const bc = {
      x: this.pointB.x - this.pointC.x,
      y: this.pointB.y - this.pointC.y,
      z: this.pointB.z - this.pointC.z
    }
    const norm = {
      x: (ab.y * bc.z) - (ab.z * bc.y),
      y: -((ab.x * bc.z) - (ab.z * bc.x)),
      z: (ab.x * bc.y) - (ab.y * bc.x)
    }
    const dotProd = norm.x * this.light.x +
                    norm.y * this.light.y +
                    norm.z * this.light.z
    const normMag = Math.sqrt(
      norm.x * norm.x +
      norm.y * norm.y +
      norm.z * norm.z
    )
    const lightMag = Math.sqrt(
      this.light.x * this.light.x +
      this.light.y * this.light.y +
      this.light.z * this.light.z
    )
    return (Math.acos(dotProd / (normMag * lightMag)) / Math.PI) * this.light.brightness
  }
}
最终效果:Demo